
Create an Event
- Navigate to Products and click on the product you wish to configure. Click More Actions > Configure Event.
- If the Product field is empty, click on Browse Products and select the product that'll relate with the event.
- Select your Variant. If you have multiple variants, you will need one Event per Variant. In this case, you can Duplicate everything to another variant, after you save the event.
- Enter a short Description about the event. For multilingual sites, you can enter a unique description per language. Use the top-right select to switch languages.
- Enter a Calendar Description about the event (optional). It appears only on the calendar page.
 Event page example.
Dates & times
To enter a date/time follow these steps:
- Click on Add date/time
- Enter the start date, start time and duration of the event (in hours and minutes).
- If the event lasts 24 hours, check All day event? and enter the duration in days.
- If you have a repeating event, check Is this a repeating event? and fill the options.
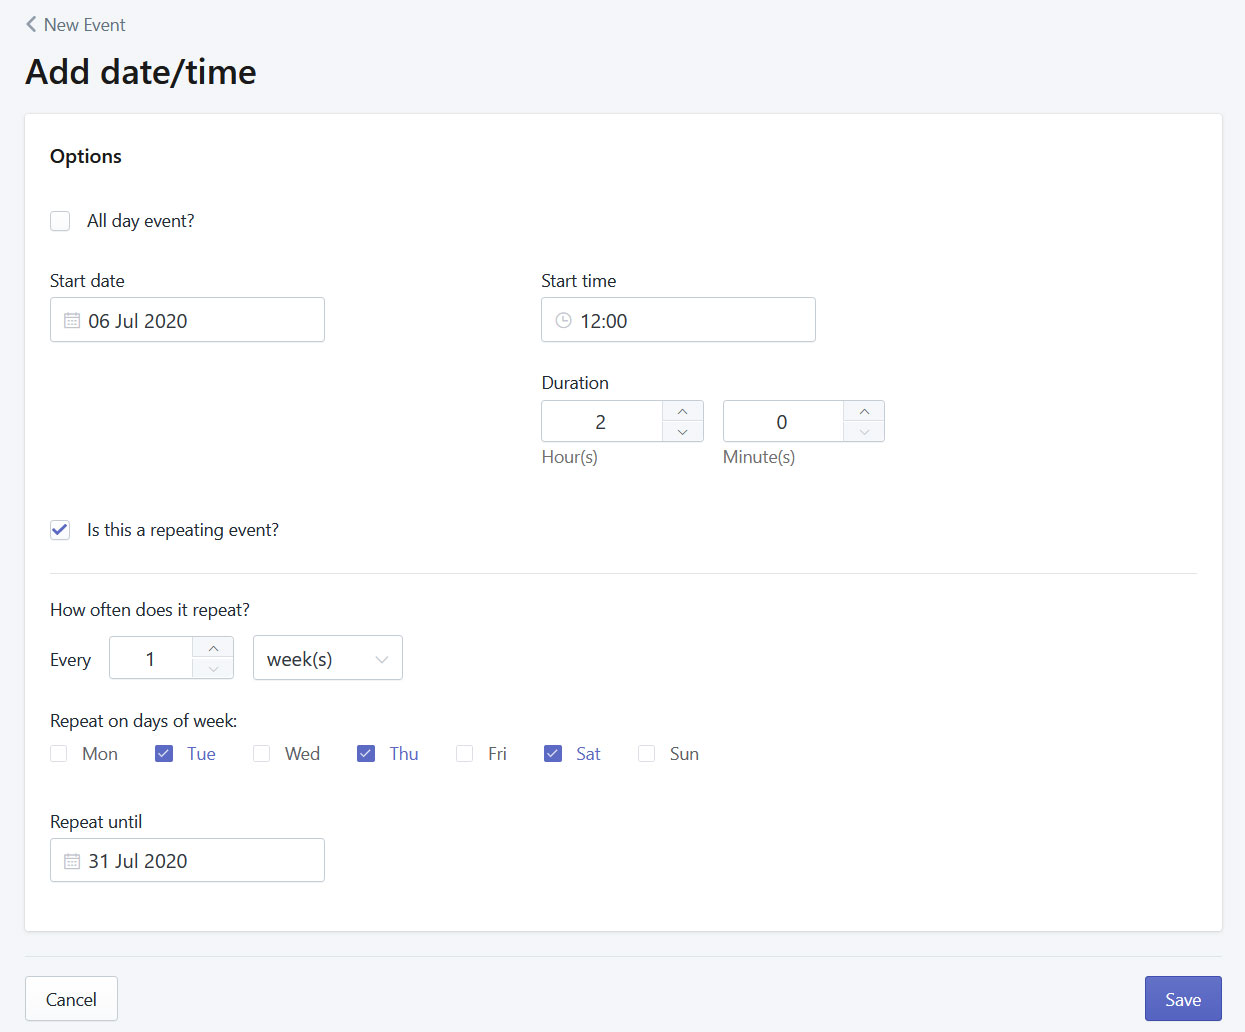 Add date/time page example. This event starts on 6 Jul 2020 at 12:00, lasts 2 hours and repeats every week on Tuesday, Thursday and Saturday until 31 Jul 2020.
- Allow your customers to select a date/time from CoAttend's calendar, by checking the Show calendar with selectable slots? option. Even better, you can add Locations and Instructors for this specific date/time.
 CoAttend's calendar (storefront). Customer can select the available date and time.
- Check Set capacity option, to define the capacity (available spaces) for these specific date/time slots and limit the number of bookings that can be made. Note that variant's quantity will be handled by CoAttend and Track quantity option will be disabled automatically.
- Click the button Save, to save your date/time.
Event's locations
An event can take place to one or multiple locations. Click on Add location to add a new location or search and select an existing one. Learn more about locations .
Event's instructors
This is the instructors that will participate to the event. Click on Add instructor to add a new instructor or search and select an existing one. Learn more about instructors.
 Locations and Instructors example.
Notifications
Click the Manage button to see the email options for this specific event.

You can add a custom text (Additional Info textarea) and enter specific information for this event. For example document links, online Zoom meeting passwords etc. Don't forget to add the placeholder on the Email Template that you would like to be visible.
 Additional Information example (for document links, online Zoom meeting passwords etc).
 Additional info placeholder on Booking Confirmation email template.
Predefined Email Templates will be used for each event. Nevertheless, you can set Custom Email Templates for this specific event. Click the Add template button or search and select an existing template. Click Save to apply the changes.
 Custom email templates per event.
Additional fields
Display a form that captures the name and email of each attendee. If you need more fields/options, add a Custom field group below.
 Additional fields.
Custom fields
Create custom fields and capture valuable information about your attendees. Click on Add group to add a new group or search and select an existing one. Learn more about custom fields.
Skip checkout
Customers will book the event instantly and skip the checkout process. An unpaid order will be created that you can mark us paid when the service is complete. Confirmation emails will be sent (if enabled) and availability will change accordingly.
Event structured data
The event experience on Google makes it easier for people to discover and attend events through Google Search results and other Google products, like Google Maps. Activating this option will automatically include the Google event schema on your product page. Learn more about event structured data.
 Event structured data option.
Banner image
To enhance the appearance of your event's page, consider incorporating a banner image.
Choose between uploading a new image (with a size limit of 200kb) or using the existing product image.
 Banner image example.
Options
Limit the number or attendees per booking. For example: A customer can add 2-4 attendees per event (useful for group bookings).
 Set minimum/maximum attendees per booking (0=unlimited).
Set a cut-off date and prevent bookings after a certain time period.
 Prevent same day bookings example.
Set a deactivation date for your event, and it will automatically be deactivated at the specified date and time. Optionally, you can change the Shopify product status to "Draft" after deactivation.
 Set a deactivation date example.
Activate the Event
To activate the event, check Active on the Status section. Click the Save button, to save your event.